- Server status:running
- Running:3
- Queued:0
- Completed:107918
Introduction
The CAGECAT web server facilitates sequence similarity searches and visualisations of microbial operons and gene clusters.It acts as a bridge between analyses executed by complex command line interfaces (CLIs) and aims to provide a user-friendly and intuitive interface to prevent difficult analyses execution for the individual researcher. Our service enables fast analyses using multiple interconnected tools, reducing the time required to execute such analyses. Researchers without programming experience encounter a steep learning curve to execute CLI analysis. Therefore, CAGECAT does not require any programming at all, lowering the technical barrier for researchers to execute gene cluster analyses. Additionally, connecting multiple gene cluster analysis tools on CAGECAT creates an online data analysis pipeline without the difficulties of connecting multiple individual tools, allowing users to combine the capabilities of each tool in customizable streamlined workflows.
Executed jobs are stored on CAGECAT’s servers for 30 days and CAGECAT uses functional cookies only. This tutorial will guide you in submitting your first job at CAGECAT and will show you how you can search for homologous gene clusters for your protein of interest using a cblaster search analysis. In this tutorial, bold sentences indicate steps for you to perform.
Example workflow: starting an analysis
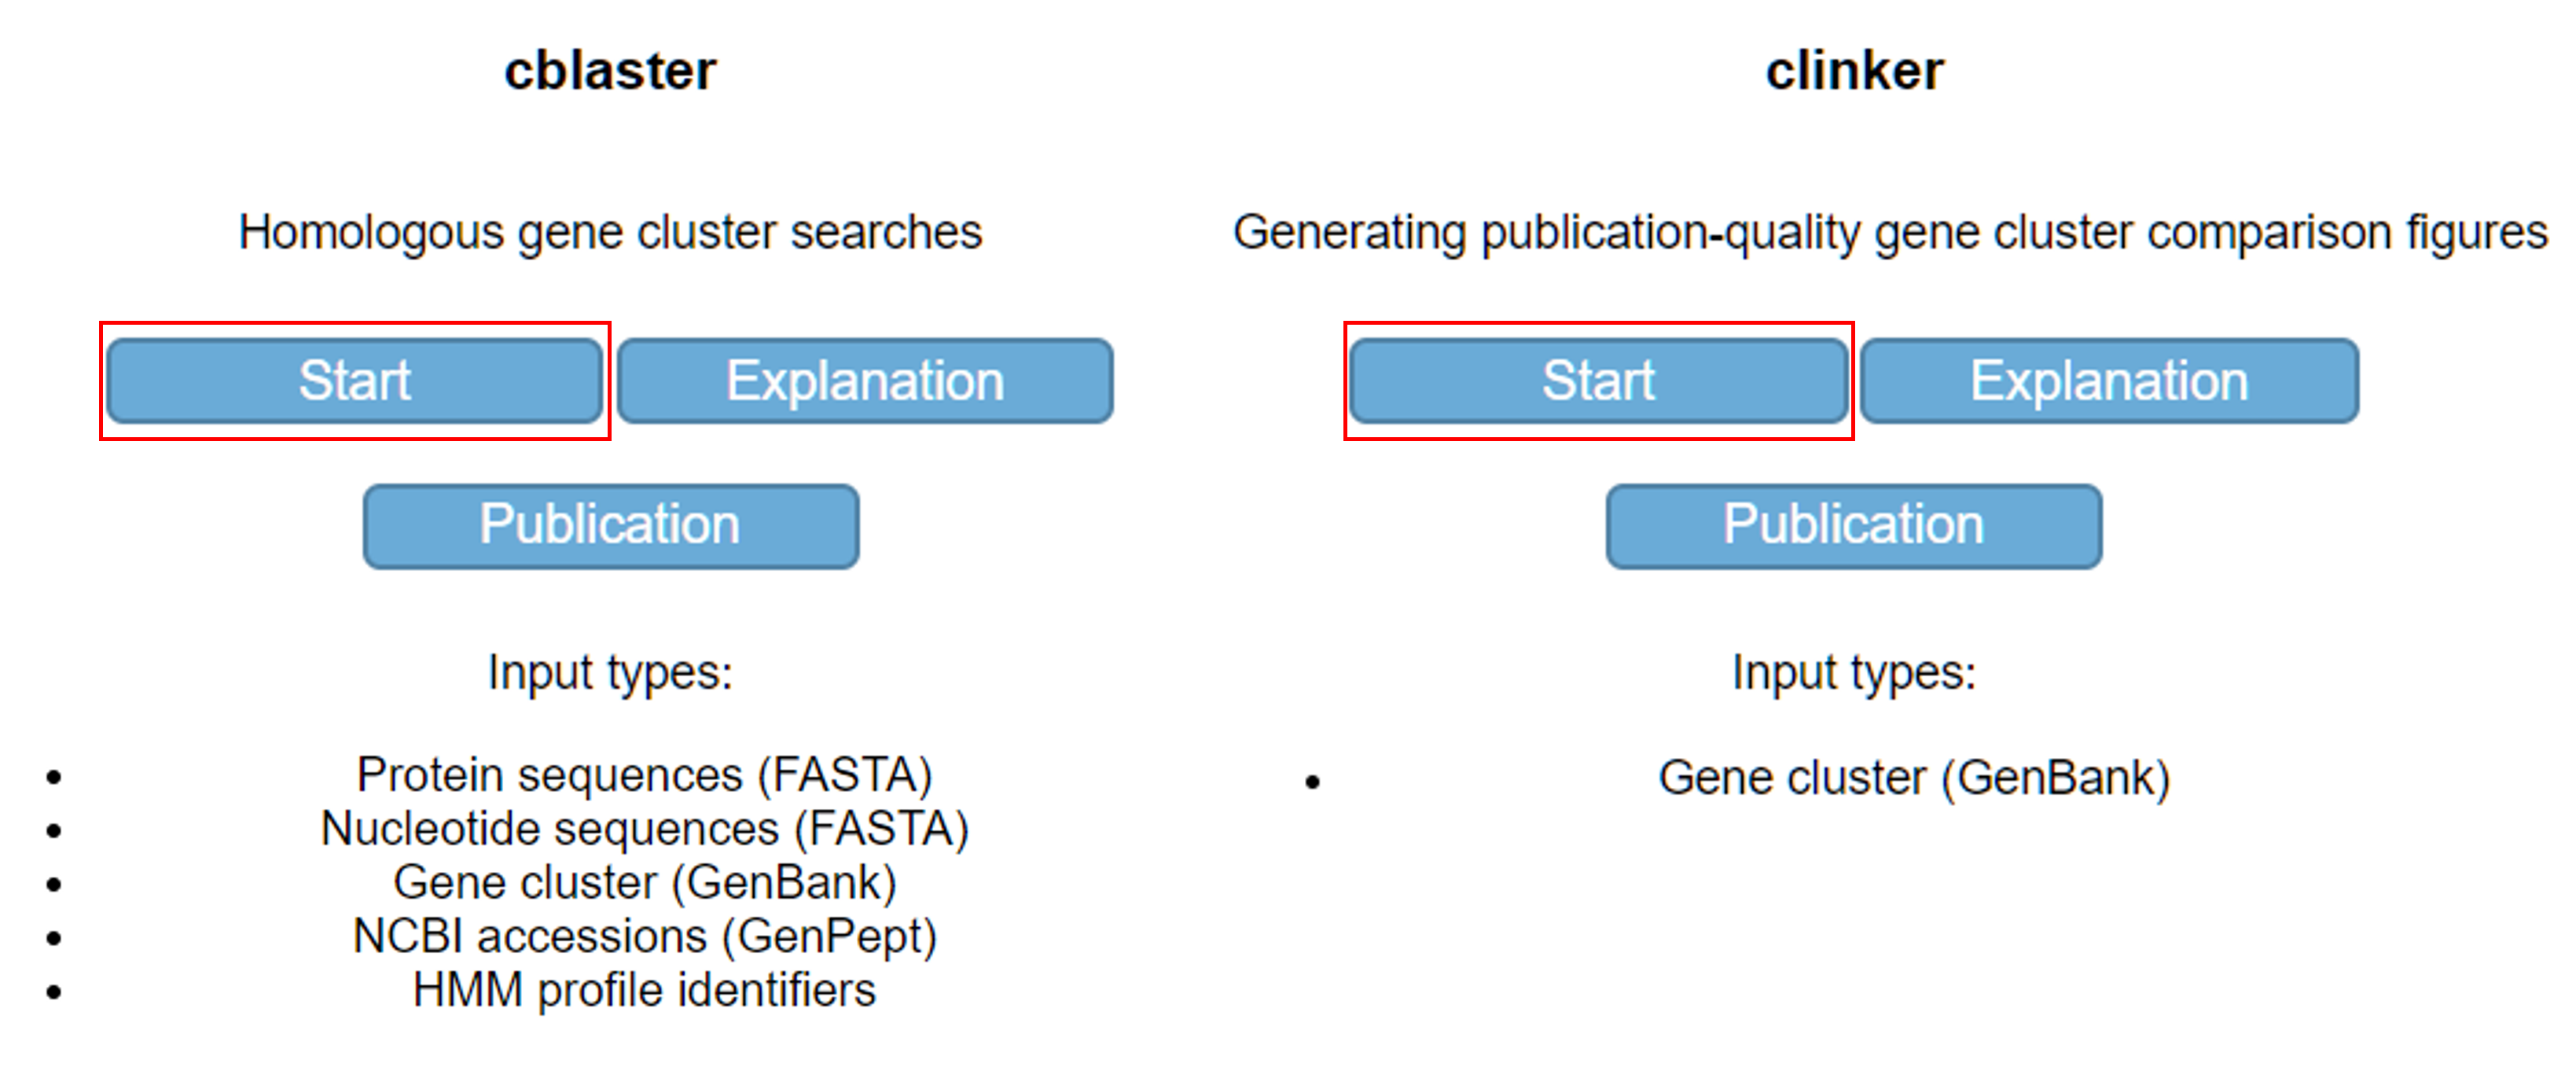
Two analyses (cblaster and clinker) are implemented on CAGECAT. One can start an analysis by clicking the corresponding “Start” button on the home page (Fig. 1). Pages with additional explanation and publications of these tools are accessible by clicking the “Explanation” and “Publication” buttons, respectively. The valid input formats are shown per analysis. On CAGECAT, executed analyses are labelled as “jobs”. Click the “Start” button located at the cblaster analysis.
Selecting job parameters
You are now viewing the page for specification of parameters to be used in your analysis. The values for parameters you enter will be used when executing the analysis and will therefore have a direct impact on the results of your analysis. Input fields with a (*) are required. Input fields have restricted input (i.e. only numbers) and leaving a required input field blank will prevent you from submitting your job. At some analysis pages, job parameters (the values of settings to be used in your analysis) are split into basic and advanced parameters. More background information on the different types of analyses and explanations can be found here.
Basic parameters
CAGECAT provides functionality to notify you by email when your job has finished executing. You are able
to provide a title for your job and enter your email address for receiving a notification email. Your
e-mail address is removed from our database after the notification e-mail has been sent. Providing an email
address
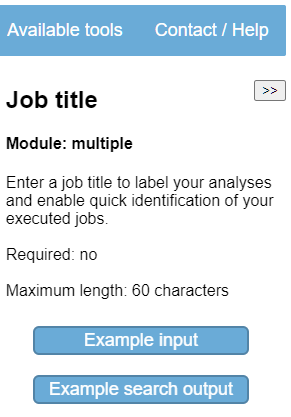
or job title is not required (Fig. 2). Note the  button shown for every parameter. Click the
button of the
job title to show an explanation of the job title parameter. The help texts are shown in the
help-sidebar
(right side of page) (Fig. 3). By default, the help-sidebar is
shown, but can be hidden by clicking the
button shown for every parameter. Click the
button of the
job title to show an explanation of the job title parameter. The help texts are shown in the
help-sidebar
(right side of page) (Fig. 3). By default, the help-sidebar is
shown, but can be hidden by clicking the  button. If the help side-bar is hidden, it can be shown by clicking the
  button.

Input section
Several input methods are available for a cblaster search: (I) Remote, which will compare your input proteins of interest against known protein sequences stored on NCBI servers; (II) HMM (Hidden Markov Model), which uses HMM profile identifiers (from Pfam) to search in genus-specific (Fungi and Bacteria are supported) databases on the CAGECAT servers; and (III) Remote + HMM, which will combine hits from NCBI servers and local HMM databases. Option III allows you to use both HMM profile identifiers and custom protein sequences as input for your cblaster analysis. Clicking on the desired search method (in the Input section) will show input fields corresponding to that search method.
Remote method
The Remote method can be used with two types of input: (I) a FASTA/GenBank file. The FASTA file can contain
nucleotide or protein sequences and should contain at least two sequences. The GenBank (nucleotide
sequences) should only contain nucleotide sequences of query genes. Full-genome GenBank files will cause an
error. GenPept files are not supported. You can upload your input file by clicking the  button. Your uploaded file will be rewritten to a new file in order to ensure a clean input for your analysis (the sanitization process). In order for this sanitization to be successful, be sure that your input file does not contain any special characters (if applicable, use an encoding of “UTF-8”). Currently, GenBank files created by SnapGene are known to raise errors during sanitization.
The uploaded
file will be used as input for your analysis and remain on CAGECAT’s servers for 30 days; (II) NCBI
accession numbers representing a protein sequence. The protein sequence of the NCBI accession number will be
used (i.e. accession numbers QBE85648.1 and QBE85649.1). If you wish to use the associated nucleotide
sequences of your proteins of interest, you are kindly requested to download the associated nucleotide
sequence files (on web page of NCBI, add all accessions of interest to your clipboard, navigate to the
clipboard, select option “Send to” → “File” → “FASTA CDS”) via NCBI and use this as input file for your
analysis on CAGECAT. Click the “NCBI entries” (
button. Your uploaded file will be rewritten to a new file in order to ensure a clean input for your analysis (the sanitization process). In order for this sanitization to be successful, be sure that your input file does not contain any special characters (if applicable, use an encoding of “UTF-8”). Currently, GenBank files created by SnapGene are known to raise errors during sanitization.
The uploaded
file will be used as input for your analysis and remain on CAGECAT’s servers for 30 days; (II) NCBI
accession numbers representing a protein sequence. The protein sequence of the NCBI accession number will be
used (i.e. accession numbers QBE85648.1 and QBE85649.1). If you wish to use the associated nucleotide
sequences of your proteins of interest, you are kindly requested to download the associated nucleotide
sequence files (on web page of NCBI, add all accessions of interest to your clipboard, navigate to the
clipboard, select option “Send to” → “File” → “FASTA CDS”) via NCBI and use this as input file for your
analysis on CAGECAT. Click the “NCBI entries” ( ) option to change the input type. All NCBI identifiers
should be separated by a new line (one accession number per line). Remote searches are dependent on the load
at NCBI services, and as such, could vary in completion time.
) option to change the input type. All NCBI identifiers
should be separated by a new line (one accession number per line). Remote searches are dependent on the load
at NCBI services, and as such, could vary in completion time.
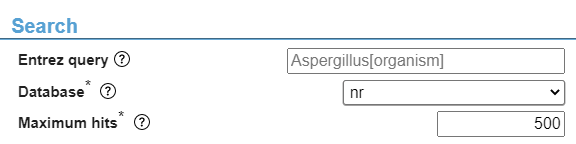
Search section (Fig. 4)
The Entrez query allows for a quick filtering of organisms (e.g. only include hits from Aspergillus genus, achieved by entering “Aspergillus[organism]” in this input field.) Note that any typographical errors can have a major impact on results. The database parameter shows the remote databases to search in. Normally, leaving the default setting (“nr”) will be sufficient. The “Maximum hits” parameter allows you to limit the number of hits your search will return. Lowering this value may result in missed hits.
HMM method
Click the “HMM” option in the “Input” section. Parameters specific for HMM-based searches appear, and parameters for Remote-based searches disappear (the “Search” section) In general, selecting a different input type or search method leads to specific parameters appearing and some other parameters disappearing. As this option does not use the parameters in the “Search” section, this section is hidden. HMM searches use HMM profile identifiers from Pfam (e.g. “PF01262”; Pfam link). The HMM corresponding to this identifier will be used to find hits within local genus-specific databases (available for Fungi and Bacteria). It is obligatory to select a genus to search in. Not all genera are available to reduce storage costs as we wish to keep CAGECAT freely accessible. If you wish to have an additional genus-specific database available for your searches, you are able to submit your wishes here. If it is a highly requested genus or you are a high-frequent user, we might add this genus to our available databases.
Advanced parameters
The advanced section of parameters is hidden by default, but can be visualised by clicking on  . Click
on to
show advanced parameters. You are able to fully execute an analysis without touching the advanced
parameters. In that case, the default values for these parameters are used. We will not go over every
parameter as their usage and function can be read by clicking the corresponding
boxes. Major options are described below:
. Click
on to
show advanced parameters. You are able to fully execute an analysis without touching the advanced
parameters. In that case, the default values for these parameters are used. We will not go over every
parameter as their usage and function can be read by clicking the corresponding
boxes. Major options are described below:
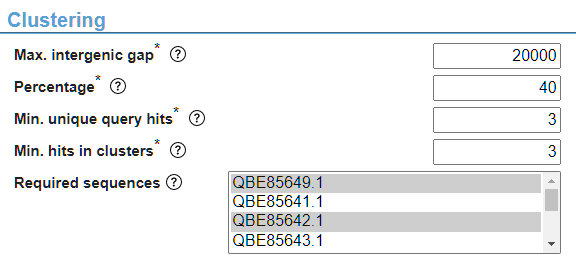
The “Required sequences” parameter enables selection of the input sequences which must be included in the output hits (i.e. the core gene of your cluster). The headers of your input sequences (from input file) or entered NCBI accessions will be shown here and can be selected by clicking on them. Upon selection, the background of the sequence header will become blue or grey. Multiple sequences can be selected by holding CTRL while clicking on the desired required sequences (Fig. 5).
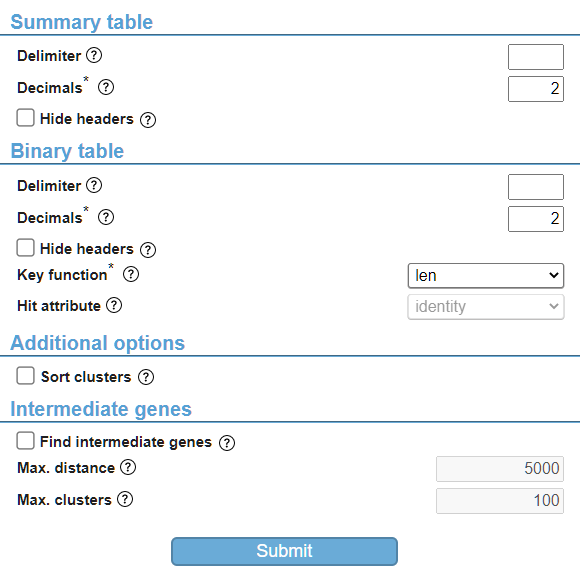
By default, in the “Binary table” section, the “Hit attribute” is disabled. By selecting a different value for the “Key function” parameter, this parameter becomes available and can be changed (Fig. 6). In general, parameters that are not changeable are disabled and will not be used in the analysis. As another example, checking the “Find intermediate genes” checkbox in the “Intermediate genes” section will enable the other parameters in this section to be used in the analysis.
Example input
On the help-sidebar located on the right side of the page, the “Example input” button will enter predefined values in the input fields. Click the “Example input” button (Fig. 3). Notice how the “NCBI entries” option is selected in the “Input” section and NCBI identifiers have been entered.
Submitting your job
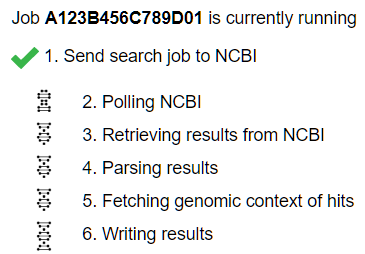
If you have finished changing the values for the parameters, you are ready to submit your job by clicking the “Submit” button at the bottom of the analysis page (Fig. 6). Enter your email address to get notified when your job has finished, and click the “Submit” button to submit your job. Your job will be placed in the queue to be executed. If there is no queue, your job will start immediately. Your input protein sequences and entered parameter values will be sent to CAGECAT’s servers and your analysis will be executed. Meanwhile, the status of your job is shown and will be updated every few seconds (Fig. 7). This status page differs per job type, as every job has different steps that are executed.
Viewing the analysis results
Note: to view an example output, the “Example output” button will redirect you to a page with example results of an analysis (Fig. 3)
The results page differs per executed analysis. Fig. 8 shows the output page of a cblaster search analysis. However, the title (if given), available subsequent analyses and download/bookmark buttons are shown on every analysis results page.
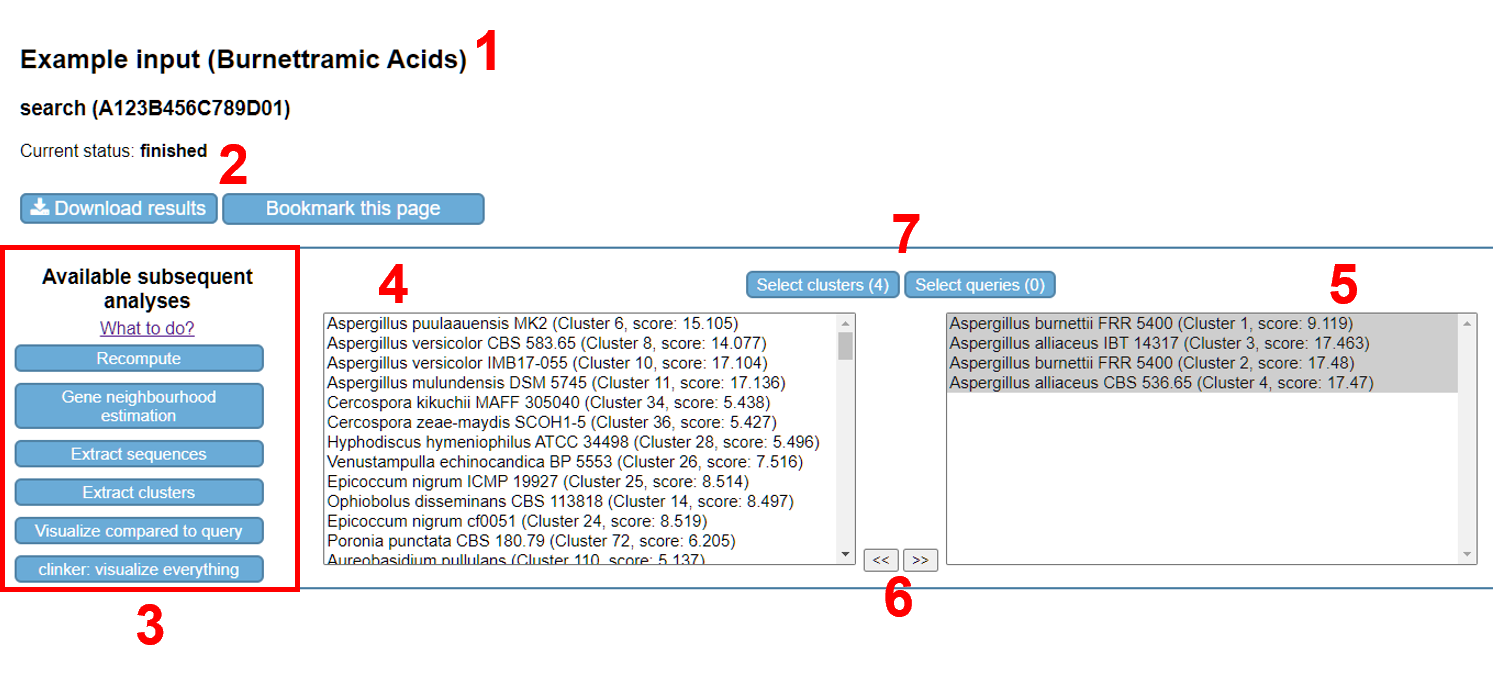
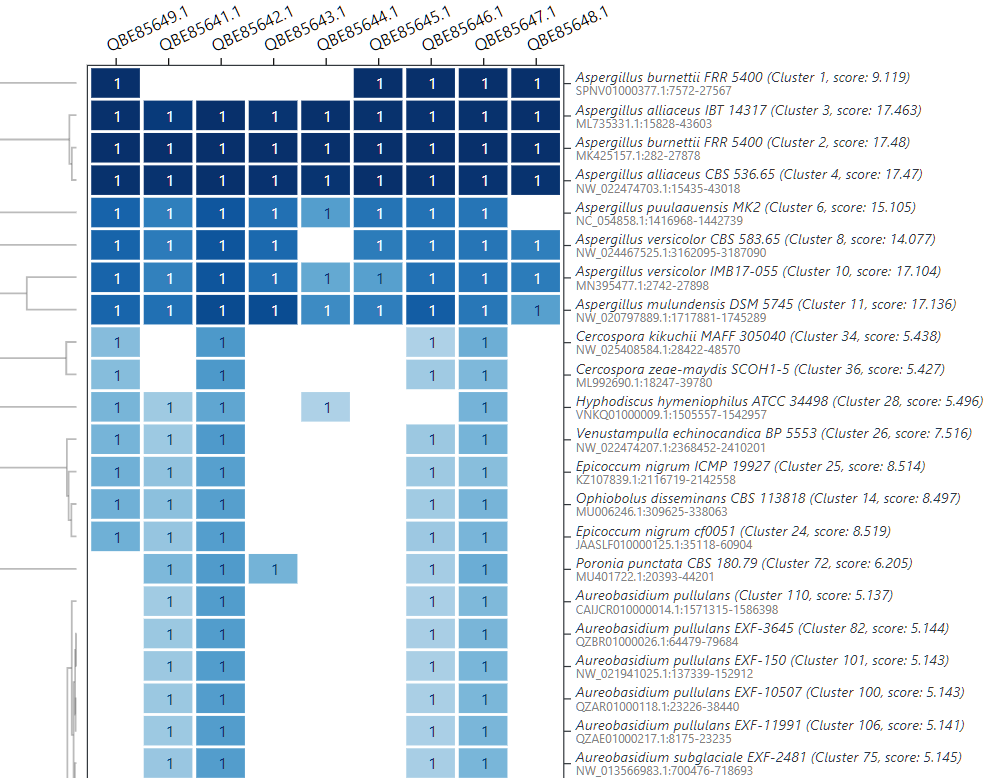
If an analysis produces a plot (HTML format), this is shown directly in your web browser. For a cblaster search analysis, the identified cluster hits are visualised (Fig. 9). Move the top 4 cluster hits to the “selected” pane (right pane).
Downloading results
Click on the “Download results” button on the output page, shown in Fig. 8 (number 2). Save the file to your computer and open it. Three folders are present (“logs”, “results”, “uploads”). In the latter, you will find any files you uploaded on the parameter page of your analysis. In the “logs”' folder, several files, named with your job ID, are present for inspection of how your job was executed and possible backtracking of errors. The command executed on the CAGECAT server is logged in the job_id_command.txt file, to give you an indication how your analysis was executed (exercise: examine how the parameters and the values you entered on the parameters page are used in the command). Your submitted parameter values are logged in the job_id_options.txt file and the log of execution of your job can be read in the file named job_id.log. In the “results” folder several other files are present of which a detailed explanation can be found here.
Note: dependent on the analysis you executed, other files may be or may not be present.
Executing a subsequent analysis
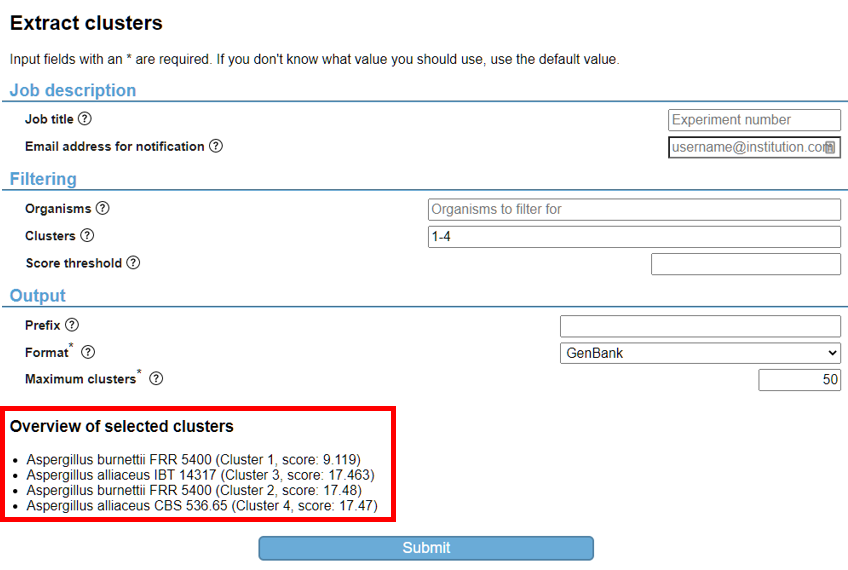
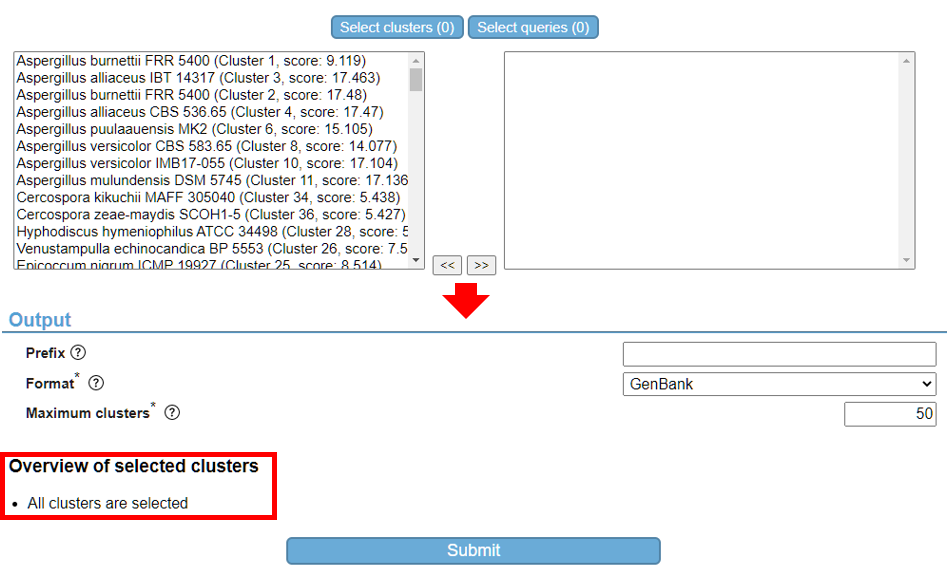
Depending on the analysis you executed, several subsequent analyses are available. An overview of possible workflows can be found here. Click the “Extract clusters” button and validate that the selected clusters are shown on the parameter page of the “Extract clusters” analysis (Fig. 10). If you did not select any of the cluster hits on the previous page, all clusters are selected by default (example shown in Fig. 11).
After the “Extract clusters” job has finished executing, you are able to download your results. However, this analysis produced GenBank files that contain the protein sequences per cluster hits. Subsequently, you are able to visualise all cluster hits via clinker (the subsequent analysis), or download all GenBank files and use these in another analysis.
Auxiliary functionality
Submitting feedback
You are able to submit feedback by navigating here.
Viewing results of an executed job
You are able to look up the results of a previous job by clicking on the “Results” pane in the navigation bar at the top of every web page (Fig. 12), by browsing here and entering your job ID, or clicking on the navigational links shown in the bar on the left side of every page (Fig. 13). These navigational links are stored locally after you submit a job.